Sunday, November 6, 2016

Project #5: Yarn Bombing

From Wikipedia:

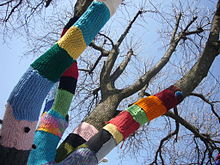
Yarn bombing, a.k.a. yarnbombingyarn stormingguerrilla knittingkniffitiurban knitting or graffiti knitting is a type of graffiti or street art that employs colourful displays of knitted or crocheted yarn or fibre rather than paint or chalk.

Yes, you read that right.  Here is an illustration of a yarn bomb on a tree, but there are other ways to do this. I've seen them on other public structures such as park benches and bike racks:


On Ravelry, I came across an organization that I used to work with (Middle Way House in Bloomington, Indiana) MWH has been planning a yarn bomb as a fundraiser. They sent out an appeal for knitters' contributions. So I collected an assortment of swatches and put them (and a tenner for good measure) in the mail:

I got back a nice note from the executive director, who remembered me after all these years . . .

Just now, I looked for their project on Ravelry, but could not find it. Maybe they didn't get enough momentum to do the yarn bomb.  I hope that they didn't throw my swatches away.  If so, I declare that the first official "Swatch Botch" has occurred. Quite the opposite of the purpose of this blog.  Oh well.

Until next time,
s w a t c h m o n s t e r 

Wednesday, August 3, 2016

Project #4: Twiddlemuff

Today's project was inspired by a crafting group that meets at my local library.  The group makes a variety of different items for several local charities.  One the recent projects is something called a "Twiddlemuff".

If my Internet research is accurate, "Twiddlemuff" is a generic name for a thick, double-layer, knitted (or crocheted) open-ended tube with small items (key, jingle bell, pom-pom, etc.) attached to the outside.  It appears that the concept began in the UK several years ago.  There are lots of examples of knitted and crocheted Twiddlemuffs on Ravelry.

A Twiddlemuff provides an outlet for fine motor activity, mental stimulation, and emotional comfort for, among other groups, those with dementia. Rather than pick at their clothes (for example),  individuals can "twiddle" with the little attachments on the muff, which also doubles as a hand warmer.

Here is a photo of my first Twiddlemuff, made from yarn stash, but not from swatches:
Side note: I discovered that there is also a commercial version of Twiddlemuff in the UK. It serves the same function, but the commercial muff is a factory-made stuffed animal with a tube down the middle and small plastic bits 'n' bobs sewn on.  The library knitting leader tells me that that is the "other" Twiddlemuff.

And then she proceeded to let me know that using swatches to make the knitted muff is NOT the same thing as what the group makes for the dementia care facility and that charity knitters don't even make swatches anyway and most wouldn't even know what a swatch is in the first place.

(!?)

So . . . now I've peeved a second charity knitting founder by sharing how to Make Things from textile debris. (Things that I make just for fun. Things that I'm not likely to sell. Things that I make to keep craft scraps out of the trash.) It occurs to me that I am "diluting their brands" with my ugly little creations.  Oh well.

(Getting to the  s w a t c h m o n s t e r  part, I promise!)

Using knitted or crocheted swatches to construct a Twiddlemuff is fairly easy, depending on what you have to work with.  After constructing both the outside and the inside of the muff, the finished length of the tube will be about 10 inches long.The width will be something like 18 inches in circumference.

(British patterns call for a tube that is 12 inches long and 24 inches in circumference, but our library group's muffs are shorter and narrower, for what it's worth. Both sizes will do the job, but the shorter length may be less likely to catch on a sleeve.)

From my collection of gauge swatches, I figured out which ones could be aligned to the correct dimensions and then sewed them edge to edge with whipstitch.  I used a strong, mercerized cotton yarn and a large-eyed blunt needle.


I'm not crazy about this color combination, but that is beside the point.  It is more important to include a variety of surface textures as well as visual contrasts.

The next steps will be:
* sew the short ends together to make a tube
* pick up and knit 40 stitches around one end
* knit circularly for an additional 10 inches
* pull the new tube inside the outer tube
* sew the lining to the outer tube
* add the doo-dads . . . . hopefully you get the idea!

Until next time,
s w a t c h m o n s t e r 


Wednesday, July 27, 2016

Project #3: The Mother Lode of Swatches

A few years ago, I came across a whopping 86 swatch squares, all knitted from Malabrigo, a soft, colorful--and pricey-- brand of merino wool yarn.  Each square was about 8-10 inches and well-constructed; they were all clean and had been blocked, all the ends were neatly woven in, and the knitting showed no errors at all. I imagine that they came from a yarn-related business that had gone under. All these squares had ended up at a thrift store.

And I scooped them all up for 25 cents each:


It was fun to lay out the squares into various arrangements.  It was less fun to sew them up (into child-sized blankets), but I managed to pull together a few:


I sent these blankets to Wool-Aid, a 501(c)3 charity in Illinois which collects warm woolen items for children in need who live in some of the harshest and coldest places on Earth.  Wool-Aid hosts an active group on Ravelry.  "Wool-Aiders" are some of the nicest (and most skillful) knitters you'll ever meet -- virtually or otherwise. If wool isn't your thing, or if you have another type of charitable project in mind, Ravelry offers many, many other groups that are easy and free to join.

So go clean out those shoeboxes or wherever you stash those scraps and put them to use!  If you are stumped, post a photo of your swatches in the Comments area and I'll help you brainstorm some ideas for projects and potential recipients.  I look forward to hearing from you!

Until next time,

s w a t c h m o n s t e r


Friday, June 24, 2016

Project #2: Stuffed Softy

Until today, this post featured information about a charity group that knits and crochets stuffed animals for children in need.  I devised a simple way to make a stuffy from previously knitted swatch squares, as opposed to knitting from scratch. My intention with this s w a t c h m o n s t e r project was to give a positive shout-out to that group, give the group's crafters a new technique for their repertoire, and to donate this toy to the cause.  Unfortunately, my effort didn't go over so well with the group's founder, so to make peace, I made several deletions both on this site and elsewhere on the internet.

This project is so easy to make that it hardly needs a tutorial, but I just couldn't bring myself to delete everything that I put together for my original post.

To make a 12-inch tall stuffed animal (which you could turn into a cat, a pig, a bear, an alien, etc.) you will first need to gather eight (8) swatches, each about 4 inches square. Choose swatches with tighter gauges to better contain the stuffing.  But if your swatches are loosely knit, you can still use them; just weave in scraps of extra yarn, as you'll see later in this tutorial.


Next, decide which swatch will be for which body part by laying them out like so:

*Head -- 2 swatches, one front and one back
*Torso -- 2 swatches, one front and one back
*Arms -- 2 swatches, one left arm and one right arm
*Legs -- 2 swatches, one left leg and one right leg

Body pieces laid out -- arms have already been sewn up and stuffed
Keep sewing and stuffing . . . Here I turned the legs sideways before sewing because I preferred it that way . . . Also, the torso swatch piece happened to have a lot of gaps due to seed stitch, so I wove a continuous piece of yarn up and down the torso to keep the fiberfill stuffing in.  The weaving adds some happy color, too.


Home stretch: Here is the completed stuffed animal -- species unknown! The finishing touches are to sew down the ears and add facial features.  For a little panache, I added a crocheted vest.  The tag is another sweet detail (think Paddington Bear) but it is not necessary.

This was fun to make -- more stuffies from swatches coming soon . . .

Until next time,

s w a t c h m o n s t e r 


Friday, May 27, 2016

Say Hello to the s w a t c h m o n s t e r !

Like the subtitle says, this site is a source for ideas for what to do with the odds and ends of fabric and other textiles that some of us accumulate as a result of our knitting, sewing, collage, or other artistic projects.  Rather than trashing these test pieces, or letting them pile up in a closet, I propose that we crafters use them as inspiration to make something beautiful, or funny, or useful.

Knitters and crocheters who dutifully make their gauge swatches before starting a project know what I mean about all those test squares.  You took the time to make them; now what?  Please do not add to the 70 lbs. of clothing per person that ends up in our landfills each year.  There are better solutions.

Following that thread ;-) there are other textiles that most people never think about. Discontinued fabric samples from the garment and interior design industries, mill ends of carpeting, yarn, tile, wallpaper, leather, and the like also end up in landfills with each new fashion season -- unless enterprising people like you and me step up and do something about it, whether it be recycling, upcycling, repurposing, etc.

This site is my small contribution in regards to spreading the word about some of the global problems involved in textile production, such as environmental abuses, labor exploitation, "fast fashion" and disposal.

Future s w a t c h m o n s t e r  posts may feature:
* project ideas (mine as well as others collected from around the internet)
* tutorials for more involved projects
* information about textile waste, with sources provided
* ongoing efforts by agencies and individuals

Until next time!
                     
s w a t c h m o n s t e r